In the Runways Home: Pastels Spring Back

Among several trends coming up for Spring 2012 are the pastels that made a loud splash during Fashion Week. Big names in fashion, such as Louis Vuitton, Calvin Klein and Diane von Furstenberg, are earning such pretty shades to substitute the loudly neons and prints that have been ruling the runways, making way for a more tranquil aesthetic.

Since there’s not any better place for tranquil than the house, let’s explore some approaches to translate this tendency into insides. Many of the ideas require only a bucket of paint or exchanging several knickknacks. If your house could use a light and airy spring refresher, keep reading to adopt a world of pastels.

Jeanette Lunde

Sometimes all a seating arrangement needs are a couple pastel pink accent chairs. Treat yourself to something fresh, or paint everything you presently have.

Sophie Azouaou

For a truly calming bedroom, pastels are the thing to do. Eliminate visual competition by focusing on just two shades, such as seafoam white and green. The softness of the pastel dominates the distance. Discuss soothing.

Tiffany Eastman Interiors, LLC

This is just another example of the idea, in pinks with a black accent. The black adds marginally more measurement, which makes the space feel equally relaxed and balanced.

Amoroso Design

Do not want to the pastel to feel to romantic or soft? Choose a color that feels crisp, such as this minty blue-green. When mixed with modern accessories and sisal runner that this stairwell feels anything but traditional.

Life in the Fun Lane

Take it a step further by refinishing a piece of furniture at a pastel. This dresser keeps its feel while appearing fresh in a shade of green. When paired with the ocean artwork, the whole vignette is your image of aesthetic serenity.

Design House

Give a side table a fresh character by covering it with a pastel tablecloth. Both feel and the colour will provide it an upgrade.

Layout Shop Interiors

Further contemporize that your pastels by punctuating them with bold colors; the contrast of soft shades against glowing neons is unexpected yet definitely chic. Try accenting the light using a brighter colour of the color: this pink bedroom feels stylish and young with accents of magenta throughout.

Zimina Inna

Another idea is picking a complementary colour to accent the pastel. In this bedroom, light purple takes centre stage when juxtaposed with orange.

Elad Gonen

Paint something unusual with pastels for a surprise twist on the fashion. It is not often you see closet doors painted with stripes in soft blues and yellows, but the look is whimsical and fun.

Elad Gonen

All you need is a dose of pastel to provide a fresh update. Consider your island : how much livelier will your kitchen feel if it obtained a color makeover?

Dreamy Whites

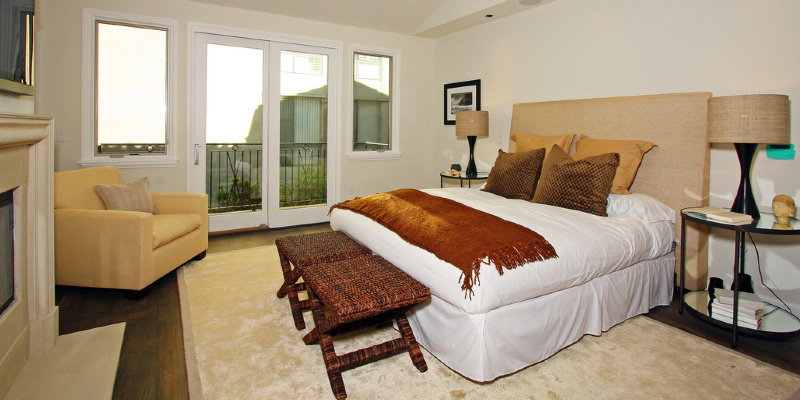
Swap out your bright or patterned bedding for a serene pastel set, whether it be a dust ruffle or merely of the sheets. Both the rest of night and your bedroom will look peaceful.

Mark English Architects, AIA

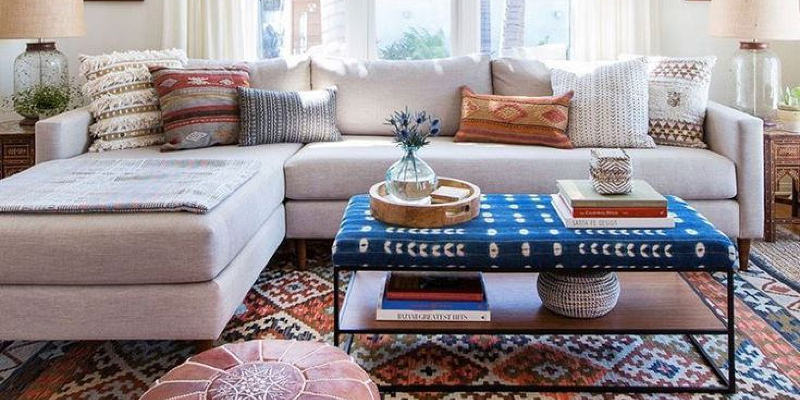
Soften your settee or couch with accents of pastel throw pillows. You can intermix them with bolder colors, or do an dab of pastel. In any event, updating your aesthetic in ways to can change again after and you are going to be embracing the tendency.

More: Inspired by Peeps: A Sliding Scale of Pastels

How to Choose the Ideal Pink

Hot Ideas for Cool Hues

See related

How to Choose and Install Windows

There are many aspects of your home that are central to its beauty and livability. However, windows are absolutely essential. They play many roles, with the first one being ventilation. Windows provide the required opening for air to flow in and out of each room and keep everything cool. Windows are also an essential part of the exterior design. How the home looks from the outside will largely depend on how well you install your window installation and their unique designs. But buying quality windows for your home is never easy.

Here are some tips to keep in mind:

Ventilation

As you know by now each window plays a role in ventilation. But sometimes you may not need this. There are other more advanced methods to ventilate your home. In light of this, some homeowners may prefer aesthetics over ventilation capability when they chose a window. There are many window repair designs that are simply in the market for aesthetics. They are beautiful, elegant, and extremely stylish. If you don’t mind finding other ways to ventilate your home, you can consider them.

Environment

The window you are planning to buy will be an external feature of your home. This means that it will be exposed to all the weather elements in your town or city. Before you buy, you must consider the weather conditions in your area. For example, there are some windows you can’t install in areas that have high levels of humidity and temperature. In areas that experience storms and tornadoes on a regular basis, there are specific window brands that you can install. Ultimately, your decision must be based on existing weather patterns in your town.

Energy Efficiency

Considering energy efficiency is a new trend but it’s very important. Increasing awareness on environmental sustainability is pushing people to consider sustainable ways to use energy at home. One of the most important considerations for homeowners is to adopt building trends or technologies that help them save energy. The windows you buy will have a massive effect on the efficiency of your home. An energy efficient window should provide proper insulation in winter and allow for natural ventilation during warm summer months. The great thing is that you can easily find highly energy efficient window brands on the market today.

Installation

Finally, you also need to consider the installation process of each window cleaning you are about to buy. Ideally, you should get windows that are easy to install. Installation can cost a lot of money. Complex window designs that require special expertise for installation will cost more money. If your budget is tight you may consider other simpler designs. Either way, pick a window that can be installed easily.

Buying the right windows is easy as long as you understand what to look out for. The simple considerations above are all important for any homeowner. However, try to learn more about available window brands and how they can complement your home’s architecture or design.

5 Ways to Insulate Windows Yourself

One of the most common ways in which heat and cold can enter or escape from your house is through window cleaning. That’s why it’s so important that you insulate your window frames in order to keep your energy costs down.

1 – Window Film Insulation

This is not the same as reflective window film.  The window film has a double-sided tape. Use a blow dryer to blow over the film after you have attached it to the window. This ensures that it sticks on tightly.

Pros

It lowers the u-value of the window, meaning greater energy efficiency.

Cons

The film might strip the paint off your window frame when you remove it.

2 – Caulking

Use caulk to fill in window spaces that are smaller than ¼ inch. Use paintable water-based latex caulk in such a case. Otherwise, use silicone-based caulk on glass and metal-based surfaces.

Pros

It’s cheap

Cons

Doesn’t look good if you don’t pain it and you cannot paint silicone caulk. You will need to keep reapplying the caulk from time to time, especially if the window expands and contracts a lot.

3 – Weatherstripping

The fixed parts of the window can be filled with EPDM, foam or felt weatherstripping while the movable parts can be filled in with weatherstripping from time to time.

Pros

Easy to use and doesn’t leave any marks or residue when it’s finally taken off.

Cons

In case you apply it on window parts that are movable, you will not be able to open or close the window installation.  To open or close the window, remove the weatherstripping, close or open the window and then apply the weatherstripping again.

4 – Spray Foam

Spray foam is best used if you have large gaps or cracks on the window. This is because it might be more disastrous to get rid of the plaster and drywall to try and fix the problem. Polyurethane is spray foam that expands.

Pros

It makes it easy for you to access areas that you would otherwise not have been able to access by hand. This is because you will use a long nozzle to spray.

Cons

It can be hard to just let it stay in the area that you have sprayed alone. This is because the foam expands and it might overflow to other areas, such as the wall and floor.

5 – Thermal Curtains

These window treatments provide extra insulation. They are available in two forms: side drawn curtains that are thick and vertically drawn pleated drapes. These curtains are much thicker than what’s normally used on regular window repair. They have tie backs that hold them against the wall to prevent air from getting into the house.

Pros

The US Department of Energy has certified such window treatments as being quite effective at providing insulation. To keep the house cool during hot months, use curtains which have white plastic backings.

Cons

The curtains only work when they are drawn. The heavier the drapery, the better. Vertical blinds might not be so effective.

When Do You Get Escrow Refund Checks?

Many homeowners with active mortgage accounts have an escrow account with their lender. Your lender quotes how much you have to pay into escrow monthly at the beginning of each year. Sometimes the lender can overestimate your entire costs for property taxes and homeowner’s insurance. If this occurs, the lender owes you a refund at the end of the year or beginning of the following.

Works

As a homeowner, you have the responsibility to pay real estate taxes and homeowner’s insurance as well as your monthly mortgage payments. If you do not pay these punctually, the tax collector can record a lien against your property or even the insurance company could drop coverage. Your mortgage lender doesn’t want either of those situations to occur, because it has an interest in your house before the loan is paid in full. Many lenders require their borrowers to utilize an escrow account. Every month you pay into the account. The money is saved before a tax or insurance payment is due. At this time, the lender pays the invoice directly on your own behalf with the money from the bank account.

Calculations

Your mortgage lender calculates how much you must pay into your bank account each month. It takes the total annual amount owed for taxes and insurance and divide by 12, to reach the monthly payment. It can get the billing information in the tax collectors and insurance companies to produce a good estimate of the grand total. Most lenders will collect additional to save in case the invoices tend to be more than anticipated. However, by law it’s only allowed to accumulate to two month’s worth of additional payments.

Escrow Adjustments

Your escrow account is reviewed to year to find out whether any adjustments are necessary. At this time, the lender also complies a report on the entire activity for the past year. This will include payments into and out of the accounts. The lender sends you a copy of the statement each year.

Refunds

If the lender overestimated your annual bills, an overage will occur in the accounts at the time of the annual adjustment review. Your lender is required by law to refund the amount. If the overage is less than $50, it can be used as a credit on the following year’s escrow payments. If the overage amount is over $50, the lender should issue you a check for the entire amount. You should also keep track of your escrow account. If your records do not match the annual statement, contact your lender to discuss the discrepancy.

See related

How to Turn Stain Veneer Into a White Distressed Finish

It is all too simple to damage an older piece of veneered furniture if you try to refinish it; veneers are thin and easy to sand through, and that can be a problem when the piece has dulled with age. An alternative that can turn a throwaway to a conversation piece without the risk of damaging the hairline would be to paint the surface white and distress the end. There is more than one means to try it, but a simple method uses flat white latex paint or wood primer. Other colours used as highlights add to the distressing outcomes.

Start the restoration by eliminating all of the hardware in the veneered piece, having a screwdriver to remove drawer pulls and door hinges. Cover the floor with plastic sheeting and provide ventilation by opening a window, using a fan or both.

Wash the veneer with a solution of 1/2-cup trisodium phosphate per gallon or warm water. This eliminates greasy deposits and also dulls the aged end, which both enhance paint adhesion. Wipe the piece dry using a clean rag.

Prepare a painting solution. If you want to create an opaque white end, the best plan is to apply a coat of wood primer followed by a couple of coats of white paint. If you prefer a pickled appearance, mix flat latex paint or primer having an equal quantity of water.

Apply primer and paint — if that’s the option you choose — using a paintbrush. Permit each undercoat dry; then sand it using 220-grit sandpaper before applying another coat. If you opt for a pickled finish, brush on the paint mixture having a paintbrush and wipe immediately using a rag. This technique allows paint to gather in pores, cracks and crevices and leaves a milky finish on the rest of the surface.

Distress the end after it dries. Among the many approaches you can do this is to hit the surface using a chain, pound it with a hammer or make tiny holes with a hammer and nail. You can also use sandpaper to remove paint in specific areas to make the end look worn.

Highlight the distressing effect by mixing a glaze, using water-soluble glazing compound and universal pigment. Using a glaze that is the identical shade as the exposed wood inside a closet or on the bottom of a table helps make the piece appear worn.

Apply the glaze using a rag, then rubbing it to areas where you desire the most shade highlighting. Allow it to dry; subsequently shield the finish by brushing on a single coat of satin polyurethane.

See related

The way to Fix a Loose Oven Handle to a Frigidaire FES367ABG

A loose oven handle can be both annoying and potentially dangerous when it prevents you from functioning the door reliably. The handle in your Frigidaire FES367ABG oven is attached to the door via a pair of screws located on the interior of the unit. In order to access and tighten the screws you have to get rid of the door and take off its interior panel.

Turn off power to the Frigidaire oven at your house’s circuit breaker panel. If you’re unsure which breaker controls your oven, turn off power to your whole home. When power is off, unplug the oven in the wall outlet to which it is linked.

Open the oven’s door to reveal its hinges. Support the doorway with a seat or your elbow, if needed, then slide the hinge locks outward to unlock them. Each hinge has its own lock.

Lift up the door and off in the oven and then lay it face-down on a flat, level surface. A table or the ground will suffice. Think about having a friend help you lift the doorway if you find it too heavy to transfer safely on your own.

Unfasten the screws around the inside edge of the doorway and place them apart. When all the screws are removed, gently lift the internal panel out of the doorway.

Examine the two door-handle screws located in the upper edge of the doorway. Look for corrosion, rust and other damage and, even if present, remove the screws and then replace them. If there is absolutely no damage, tighten the screws by turning them clockwise with a screwdriver until the handle is no longer loose.

Reseat the internal panel in the doorway and refasten the screws before the panel is tight. Lift the door back into position, refasten the hinges and then slide the hinge locks back into position.

Test the handle to make sure it is still tight, verify that the door opens and closes properly and then plug the oven back into the wall outlet and turn the power back on at the circuit breaker.

See related

What kind of Paint Can I Utilize Bathroom Wainscoting?

If you’re planning on lining bathroom walls using wainscoting, you need to protect it from moisture. You don’t have to utilize oil-based or exterior paint, though; inside latex paint works well while aiding the paneling look its best.

Mildewcide and Primer

The walls in a bathroom, especially those around the tub and tub, are subjected to condensation and humidity, and many semi-gloss latex paints can defy that. They will better withstand the mold that can grow in such circumstances, however, if you include a mildewcide into the top coat. Since wainscoting is made from wood or fiberboard, you can’t get away with a self-priming paint. A shellac- or latex-based wood tip is critical to seal the grain and improve adhesion. Tinting the primer can help avoid the need for multiple top coats.

Finish With Latex Paint or Polyurethane

Generally, semi-gloss wall paint is durable enough to handle the requirements in a regular bathroom, however not all bathrooms are average. If yours has poor ventilation or you have had previous difficulties with peeling paint and mold, your wainscoting may require a coat of full-gloss latex enamel to correctly protect it. You may prefer to stain the wainscoting as opposed to painting it. If so, safeguard the stain with clear polyurethane; water- and solvent-based products are equally acceptable.

See related

Sustainable Living in 196 Square Feet

Chris and Malissa Tack did not believe they had been living in surplus. Content in their 800-square-foot apartment they had everything that they wanted. However, a spontaneous crash course in small living changed their minds. Turns out, they could want less.

Following weeks of planning and more than 800 hours of building, the couple had a new residence, with 133 square feet of living area plus a 63-square-foot sleeping loft above the kitchen. Set to a 20- by 81/2-foot trailer, the house feels comfy, comfortable and anything but cramped. “We believe that small living boosts living within your means,” says Chris. “That may be a great option for many men and women.”

in a Glance
Who lives here: Chris and Malissa Tack
Location: Snohomish, Washington
Size: 133 square feet of living area plus a 63-square-foot sleeping attic

The Very Small Tack House

The Tacks installed solar panels to power the home, although they can connect into the local grid if necessary. As a result of the panels along with the couple’s low electricity requirements, the solar array meets most (if not all) of the couple’s power needs during the summer. In the winter they spend only $1 per day on electricity.

The home sits on a 5-acre home with a different home and a studio apartment. The couple pays the owner of this parcel to the right to park their home here and also to utilize the washer, dryer and a nearby toilet.

The Very Small Tack House

Since the few employs another toilet on the property, the only water that leaves their home is graywater in the sink and shower. “We are very conscientious of these goods we use for cleaning and bathing,” says Chris. “That which we use is biodegradable”

The Very Small Tack House

The front door opens to a joint live-work space. Malissa, who works in 3-D design, planned the entire home herself. “When building such a small area, particularly on a trailer where you have fairly set measurements, you’ve got a certain amount of creative freedom,” says Chris.

The Tacks did everything they could to decrease power use and help save space. Each the lights use LED bulbs. Malissa’s computer monitor doubles as a television, cutting back on accessories, power and unnecessary space. Her desk folds down when not being used.

The Very Small Tack House

A 9- by 7-foot sleeping attic sits above the kitchen and bathroom on the other side of the home. The attic fits the couple’s queen mattress perfectly, using a floor-to-ceiling height of just 41 inches in the peak. Dormers provide a little extra headroom on the sides.

The Very Small Tack House

The residence is filled with smart storage options, such as this storage seat in the living room. Chris designed it so it may be taken away entirely, if necessary. “Since we had never lived in such a small space before, we didn’t know what unforeseen factors could prompt us need to utilize the space differently,” he says.

The Very Small Tack House

Natural materials keep the home safe and ecofriendly. Wool insulation in the walls and subfloor keep a consistent temperature, while a tung oil coating protects the pine walls without the risk of off-gassing.

The Very Small Tack House

Of course, moving from an 800-square-foot apartment to less than 200 square feet meant the Tacks had to radically decrease their possessions. “It was not as hard as we thought it would be,” Chris says. “There were books and magazines of mine that we’d moved into Michigan, to New York City and then across the nation to Washington. It seemed quite silly, if you consider it.”

The few hung on to their favorites and must-haves, and then donated nearly everything else to Goodwill, simply selling a few bigger items on Craigslist.

The Very Small Tack House

The kitchen was the toughest part of the home to design. Initially the couple wanted to fit an oven to the space, however they installed a simple two-burner propane cooktop, very similar to what is used on ships, rather.

The Very Small Tack House

Because the kitchen is really near the toilet, the Tacks installed only one sink in the kitchen to the entire home.

The Very Small Tack House

The owner of the property is a licensed plumber and electrician; he also helped Chris and Malissa determine the installation for their own kitchen and toilet. They built a special spot for their cat’s litter box to the left of this composting toilet.

The Very Small Tack House

The shower is a classic oak wine barrel, sawed in half. After each shower, they carefully rinse it out with fresh water and remove any extra water using a sponge to keep the unsealed wood in good shape.

The tiny house gets its water supply in the habit 38-gallon steel water tank. An electric water heater can be wired into a switch, so the few can turn it on just when they need hot water.

The Very Small Tack House

An integrated cabinet retains all their hanging clothes and Chris’ camera gear.

The Very Small Tack House

The couple left a very simple but enchanting outdoor dining set from pallets.

Know more about making furniture out of pallets

The Very Small Tack House

Chris and Malissa would be the first to admit that living in a tiny house is not for everybody, but they are pleased to dedicate to their living situation for the time being. They plan to stay in the tiny home for at least another three to five decades and then will build something a little larger — around 300 square feet.

More: A Tiny, Joyful, Ecofriendly Home

Read more innovative small homes

See related

12 Fun Backyard Forts Grown-Ups Could Love

While any kind of system in a tree or a cardboard box clubhouse will make a kid happy, it is an excellent bonus if this permanent structure is appealing for adults. Even better if it’s a location we prefer to escape from time to time.

With the most up-to-date in kiddo fort designs, children get the advantages of climbing walls, fire sticks and suspended bridges, while the grown-ups get to gaze out on small structures that seem like an architect’s design or a Mondrian cube. Who knows, after the kids grow up, possibly the adults will take these over as offices, potting sheds, studios or money-making rentals. Here’s a glimpse at 12 favorites.

Sometimes I think designing and building tree houses brings architects back for their woodshop times in design school. This fabulous fort resembles an architectural design to me, with thoughtful overhangs to mitigate direct sun and an assemblage of reclaimed wood. Additionally, it resembles a lot of pleasure with its ladders and ropes, which is the point after all.

Aitken and Associates

This floral fort wins the Best Use of an Old Tree Stump award. While I wouldn’t recommend this wisteria-draped getaway for anybody allergic to any type of stings, it may be a great area to perform scenes from Romeo and Juliet or even Cyrano de Bergerac.

Verner Architects

This slatted elevated fort is enjoyable to climb up to hang out in and descend from, while its modern architecture is not anywhere near the eyesore most tree houses are for Mom and Dad.

Verner Architects

Keith Willig Landscape Services, Inc..

This fort makes the most of the lawn’s change in altitude. From front one sees the tempting pleasure of the nets and fire rod, while around back there is a rod, a slide and a swing set.

Keith Willig Landscape Services, Inc..

Bjon Pankratz

The ordered yet ramshackle style of the two-story fort provides it architectural interest while still attracting children. Its mixture of materials is quite Austin, Texas, keepin’ it fashionable and weird.

Bjon Pankratz

When it’s lit up at night, you can observe how the home was built right around a tree.

This is another of those easy-on-the-eyes structures. The tall, Jenga-like tower has peekaboo slats in addition to its own deck and roof deck (complete with sail shade).

In addition a climbing wall alternative is up a balcony, in addition to the side.

Know more about home climbing walls

Barnes Vanze Architects, Inc

This cool little cube is certainly easy on a modern artwork fan’s eyes and may even function as a sculpture in the backyard.

Barnes Vanze Architects, Inc

It has a great playspace interior which carries a chalkboard wall, bookshelves, a window seat and even a peekaboo clear panel in the ground which may sit beneath a koi pond.

Know more about the playhouse

Hugh Lofting Timber Framing, Inc..

A suspended bridge is currently the most recent craze in garden forts and tree houses. Maybe it’s due to the rising popularity of Costa Rica as a vacation destination? I am not certain what brought this on, but it is in most of the cool backyards at this time.

Hugh Lofting Timber Framing, Inc..

Another attic inside gives a fort within a fort.

Alex Amend Photography

The whole family pitched in to build this wonderful tree home overlooking the San Francisco Bay. They used as many reclaimed and vintage items as you can, including stained glass windows.

Alex Amend Photography

Now the kids are all grown up, the household rents the appealing and cozy tree home to visitors (you can stay here too).

Know more about this tree home

Lobalzo Design Associates, Ltd

These homeowners built a playhouse which matches with their particular home, right down to the planter urns, for their toddler, Birdie.

Lobalzo Design Associates, Ltd

The family are big fans of Beatrix Potter and MacKenzie-Childs. The interiors are inspired by both and also are built to stand up to adults that are visiting for tea parties and story hour.

Watch more of Birdie’s nest

Grant Davis Thompson, INC..

This big garden in Brooklyn, New York, was crying out for a bug-free area for all ages to enjoy.

Grant Davis Thompson, INC..

New York architecture firm Palmer Thompson-Moss produced a 200-square-foot screened-in space complete with a ice chest, outlets for speakers, salvaged light, built-in benches and even a sandbox.

Know more about the playhouse

Archer & Buchanan Architecture, Ltd..

OK, my fellow nerds, we’re never going to top this one, however hard we try! It’s a fort for grown-ups … grown-ups who love J.R.R. Tolkien.

Archer & Buchanan Architecture, Ltd..

The owner is a significant collector of J.R.R. Tolkien novels, manuscripts and artifacts, and The Hobbit House is the greatest spot for preserving and appreciating his collection.

Archer & Buchanan Architecture, Ltd..

The Hobbit House even has a rounded door crafted of Spanish cedar. Bam! Top that — I dare you!

Know more about The Hobbit House

More: The Most Beautiful Kids’ Tree House You’ll Ever See?

See related

Dream Ceilings: Groin Vaults Inspire Overarching Awe

For very good reasons, builders and architects have been creating vaulted ceilings for millennia. It all starts with the desire to cover a space. In smaller chambers a flat ceiling is easily and easily constructed. But in a large room or collection of chambers, a flat ceiling has many constraints. Thus domes and vaults were invented that may span the spaces between walls and make lovely and spacious rooms to gather in.

My Villa Austin

After two curved vaults combine. There are numerous sorts of vaulting systems. The easiest vaults are both linear systems: the simple V-shape vault, which happens on the shape of a sloping roof, and the barrel vault, which takes about a curved, half-pipe shape to span between walls. Both highlight the rectangular proportions of a space and indicate that the distance can just keep going.

The groin vault is nothing more than just two barrel vaults laid perpendicular to one another. Unlike a barrel vault, which is based on two walls for assistance, a groin vault relies on four corners for assistance. Arching gently or at a steeper, more pointed fashion, the four ribs (or arrises) help to define and manage the distance, creating a focus at the center of every vault.

Creating an inward focus. When used to cover one space, a groin vault creates a strong visual center. The ribs springing up from the walls and then intersecting at the top have the impact of making a space which is very inwardly focused, even when there are large expanses of glass which let outward views.

While groin vaults aren’t very common, particularly in residential design, they are wonderful ways of covering a space or set of rooms. I tend to consider the design impact as every room’s being covered and formed by a tent structure. The overall lightness and tensile quality of the groin vault make it look much like a sheet of fabric stretched over a frame. The result can be astonishing, provided these vaults are traditionally made of stone and other masonry.

Studio William Hefner

A joyous lightness. When groin vaults are used in series — state, since the ceiling on a linear flow distance — the arrises make a joyous rhythmic pattern. Each individual groin vault also creates a location for a large expanse of glass which allows an abundance of natural light into the space.

Vanguard Studio Inc..

A groin vault is also a nice way of layering the distance of a space. By providing a strong, central focus and the possibility of arched openings at each of the four sides, it can enable the creation of alcoves, niches, recesses and the like that can be wonderful spaces along the periphery.

Pitsou Kedem Architect

While groin vaults tend to get a more traditional architectural appeal, they can be quite successfully used for a contemporary aesthetic. Modern, machine-made accessories and furniture locate themselves comfortably in the home in an older building where we view that the stone-by-cut-stone structure of a groin vault.

Next: More ways to include interest overhead

See related