Category: Small Bathroom

Tricky Basement Toilet? Cool Design Prospect!

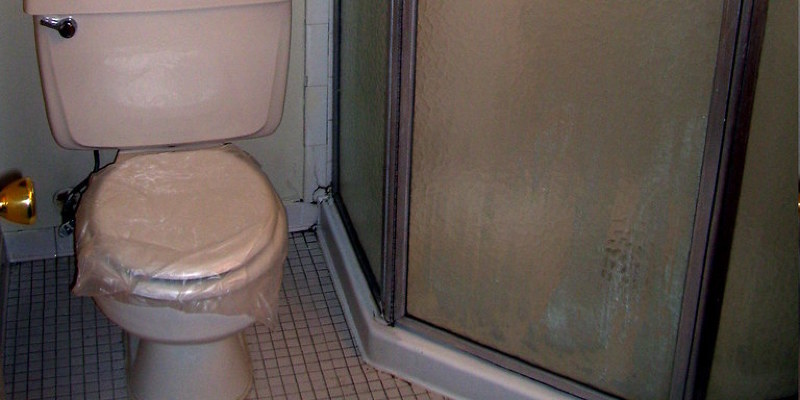
Little spaces, outbuildings and basement bathrooms are some of the jobs on the bathroom remodeling spectrum. You have got to plan a lot beforehand with so much happening in this little space. Not only do you have to ventilation and route plumbing, but you have to consider the space you’re building in. Is it a hundred-year-old house with a rock foundation that might be a design wow? Or is it a modern building with a construction? You also have to consider what’s happening on each side of the door, which impacts, well, everything.

Gina Bon

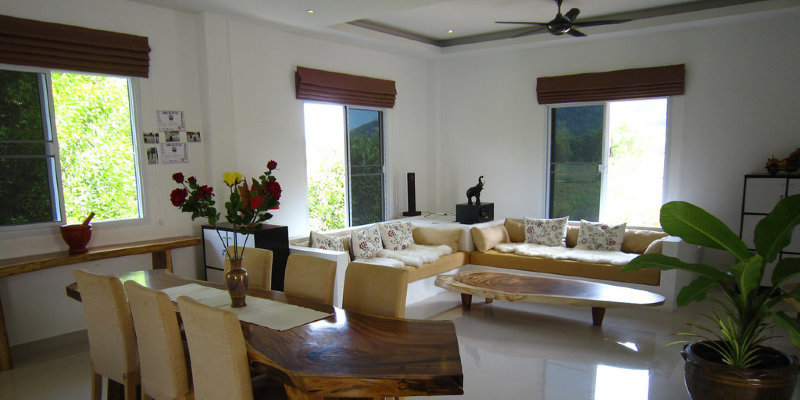
Be bold. The typical strategy for a bathroom in a basement would be to hide it, but occasionally there is simply no way to pull this style move off that isn’t dull. The reason: Basement bathrooms will need to compete for space with the furnace, water softener, hot-water heater, stairs etc.. And occasionally after I lay out the bar, bedroom and whatever else makes the space awesome, there is no place awesome left for the bathroom.

In this instance it is often best to run hard in the other design management and observe it in plain sight, make the bathroom component of the plan along with a bit of their experience. Celebrating “undesirable” things is one of my preferred design tricks.

Fischer & Frichtel

Always vent. Among the most crucial parts of a bathroom in a basement would be a sufficiently powerful ceiling fan to evacuate the moisture — not letting it move in the ceiling or utility space, but outside. Like, where the sky is. While you’re showering, steam is a tiny cloud. But the water falls back to the baseboards and turns back into water, when you’ve left. Then it becomes that gross stuff you do not wish to wash.

A vent fan is your way to get the moisture from the house. I repeat, out of the house. Don’t get me started on how many times I’ve seen bathrooms beamed into the attic or a different hidden area. Your attic might be cold or hot, but it is still technically inside. Get that moisture out!

Paul Welschmeyer ARCHITECTS & energy advisers

DiGuiseppe Architect

Expose the construction. A basement bathroom offers abundant opportunities to use the present raw construction of the house. Rubble foundations, for instance, are basically constructions. Cover their looks that are powerful with shingles?

And consider the plumbing, also. While drain lines and electrical services aren’t all that cool to look at, aluminum distribution lines (water lines) can be gorgeous. If you’ve got an open structure, it is sometimes easiest — and awesome-est — to make the most of what you’ve got.

Exposing pipes can be a cool way to make a basement space sense industrial or like a person cave. It’s also far easier than building soffits and bulkheads to hide everything. If you’re a building geek like me, it is best to design a space where you can see the working parts.

Krause Construction Denver Colorado

Boost solitude. Many builder-grade homes include hollow-core doors. These doors have a real-looking timber grain but are composed only of 1/4-inch-thick components, and are basically cardboard and air inside.

While hollow-core doors can be OK for certain rooms, I try to use solid-core doors for the bathroom to help keep the bathroom experience as much of a one-person affair as possible. Solid-core doors deaden the sounds generated in the bathroom. So if you’re having a book club meeting or down poker night there, a good door and insulated wall framing that both deaden sound are fine for everybody.

HomeTech Renovations, Inc..

Build up. Small-space remodels can often be more challenging than big-space overhauls. So much must happen in such a tiny area, it is like dancing on the head of a pin.

So when I move into a small area, I’m constantly thinking about how I can use it smartly, use it and make everything seem like it is supposed to be there.

Jim Burton Architects

Be one with nature. Basements aren’t always underground. When designing or constructing a bath, take into consideration the approach from the outside, as well as the windows, egress and view, from inside and outside the john.

See related

Merge Your Tub Space into a Shower — the Planning Phase

There are many examples of large bathrooms, it’s easy to lose sight of the fact that most of us have bathrooms that are about 50 square feet (5 by 10 ft). A fantasy shower may frequently become a reality only if it fits to the footprint of a dated tub. But what’s the best method to go about this conversion?

The very first step to convert a bathtub to shower would be to put down everything on paper. Before you start ripping out tile, bringing home sale items or looking for the best grout color, be sure that you measure, plan and research.

Mabbott Seidel Architecture

Measure the toilet exactly. Yank on the finished wall dimensions, right down into the 1/8 inch. Most bathtubs are 60 inches wide, which is a good width to get a shower. The depth is the kicker. Aim for at least 32 to 34 inches from the finished tile wall into the upcoming glass shower door.

You will also need to to have a finished ceiling height of 80 inches minimum and a shower that’s at least 30 by 30 inches to comply with the National Kitchen & Bath Association’s guidelines for bathrooms. In case you decide to plan to get a seat, be sure it doesn’t crowd this distance of 30 by 30 inches minimum.

Record the bathroom location. A distance of 15 to 18 inches from the the middle of the bathroom to the glass on the new shower door tends to be comfortable.

Work out the shower-door swing. Where will you set the door on your new shower so it does not interfere with the bathroom or vanity? I love to use a large scrap of drywall to put out the potential shower-door swing, and then check the distances of the drywall into the toilet and vanity.

From the renovated bathroom here, a little 1926 tub was replaced using a curbless shower. The walkway from the vanity into the shower has been too tight to get a whirlpool bathtub door, which explains precisely why this shower has two glass block walls instead.

Hint: In the event the toilet floor is going to become wet outside the shower, then pick a little tile or a different slip-resistant material.

DKOR Interiors Inc.- Interior Designers Miami

Make sure you’ll still have tons of space. When you substitute a bathtub with a shower, the bathroom can start to feel crowded. Make sure that you pay attention to this it seems right to you.

Try to keep at least 15 inches area from the middle of the bathroom to the new shower glass. If your shower ends up being on the side, you can skimp on this measurement a little.

Hint: Hold up a sheet of scrap drywall to function as a fake glass panel and also sit a 5-gallon bucket to mimic the toilet’s location. This could help you decide how close you like the glass and how large you’d like your shower.

Stand at the area where your shower will be. A shower depth of 32 inches feels little to me, however, might work for you. A depth of 34 to 36 inches tends to be perfect, but do not crowd the bathroom. Make sure that you check the local code for minimum distances, too.

Take out the door if it’s causing problems. Who says you require a door anyway? And start looking into heated floors if you decide not to have a shower door. Floor heat is quite good at keeping the toilet floor dry in addition to warm.

Hint: If you intend to get a doorless shower, then you’ll need to be extra careful when using a handheld shower fixture. A fixed showerhead or rain head (such as the one in this photograph) will continue to keep the water inside the new shower.

More tips on working with a doorless shower

kbcdevelopments

Take your time looking for fittings. Shopping for fittings can actually be fun! Research the options and look for specials and potential combos. Do not feel like you need to use all the same brand — I frequently use fixtures from two separate companies that still look good together.

Hint: If you’re building a steam shower, then contemplate Dornbracht fixtures. Bear in mind that a steam shower should be constructed by someone with at least five years’ expertise in vaporproofing.

BY DESIGN Builders

Consider your tile and lighting layout from the start. This is essential to some polished-looking shower. Be certain you include lights on your shower, not just around it.

Depending on your shower size and cosmetics, yet, two or even four lights might look best. When you eliminate your old bathtub and tub surround to make room for the new shower, this is the ideal time to test that your light system can be installed like you had planned. Often the ceiling framing over a bathtub is easily adjusted to accommodate a lighting plan.

Do not tile with no finished light sources set up. Without a light source set up, it is hard to know how any lippage might look. At a shower the lights are often quite close to the wall, which will show every tiny flaw at a tile installation.

Hint: Organize your tile designs early, using the ceiling height as a reference. Attempt to avoid sliver reductions in tile designs. Drawing the layout on paper helps — once you have this finalized, you may use your vinyl grout lines to put out pulp market locations and shower fittings.

More ways to light up your shower

BY DESIGN Builders

Decide what developments you’re going to want. Goal is key here. How will you use the shower? Do you require a seat? Somewhere to place your shampoo? What about a window? All these extras are important to this renovation and help narrow down a construction plan.

Hint: If you’re building a shower that will consist of items like benches, windows and pulp niches, be certain the waterproofing is brought right up the walls and require extra care around the chimney. Kerdi Repair is a superb product for seaming the window into the bathtub’s waterproofing system.

Next: Step 2 — Choosing your new shower fittings

More: manuals to remodeling your shower

See related